Content design guidelines
A well-designed Slide or Content looks right on every screen it plays on, is easy for others to update, and plays smoothly even on modest devices. These guidelines collect what works, from the first page to the final check before you assign it.
Before you start
- Set the right canvas size and orientation for the screens the item will play on, before you place anything. Resizing a finished design later usually means rearranging every element.
- Keep the design simple and easy to modify. Someone else may need to update it next month.
Layout and alignment
- Leave a safe margin along every edge, so nothing important sits right at the border of the screen.
- Align related elements on the same grid, with balanced spacing between them.
- Keep every element inside the canvas. Remove leftovers you parked outside the visible area while designing.
Fonts and text
- Use at most three fonts in one design, and choose fonts that are easy to read from a distance.
- Give every text box enough room, so longer text does not overlap other elements or break the layout.
- Turn on dynamic font size with a minimum size for text that changes, so longer text shrinks instead of overflowing. Learn more: Dynamic font size
- Keep single-line text on one line by turning off line breaks for it.
Images, video and animation
- Use optimized, lightweight files. Export images at the size they are shown on screen instead of uploading huge originals, and prefer compact formats such as PNG or SVG for graphics.
- Use "cover" for background images and "contain" for logos, so backgrounds fill the screen and logos of any shape stay whole. Learn more: Fit settings
- Keep animations minimal, smooth and non-distracting. Repeating animations can hurt display performance and cause memory leaks on some devices.
- When in doubt, use the safest video format: MP4 with H.264 video (High profile, Level 4.0) and AAC-LC audio, at 1920 × 1080 and 30 fps. This is the format our support team recommends when a video does not play.
- Check the format before you upload. Each player supports its own set of file and video formats:
- Use only images and fonts you are allowed to use commercially.
Make it easy to edit
- Expose only the fields people need to change in Quick editing, and only the properties that matter for each one. Too many editable fields make a simple update confusing. Learn more: Quick Editing
- Design editable parts so they still look right when the text or image changes, for example a longer name or a logo of a different shape.
Convert a video to WebM (VP9)
If a video does not play or stutters on a device, the codec inside the file is usually the cause. This happens most often with 4K and portrait 4K videos on Android. Converting the video to WebM with the VP9 codec solves this in most cases.
You can convert videos with HandBrake, a free, open-source video converter: Download HandBrake
-
Open your video in HandBrake.
-
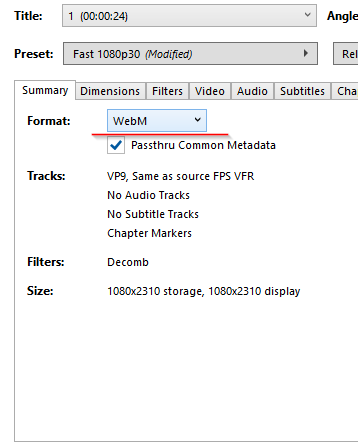
On the Summary tab, set Format to WebM.
-
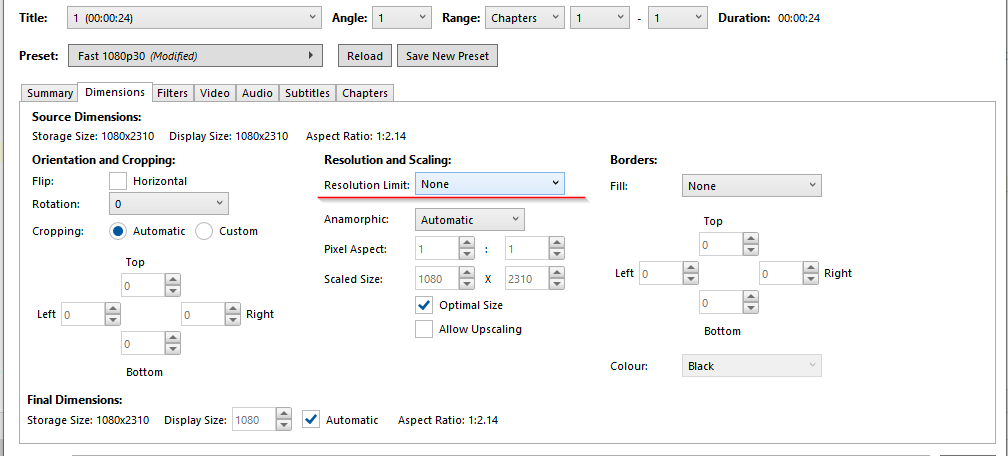
On the Dimensions tab, under Resolution and Scaling, set Resolution Limit to None, so the video keeps its original resolution.
-
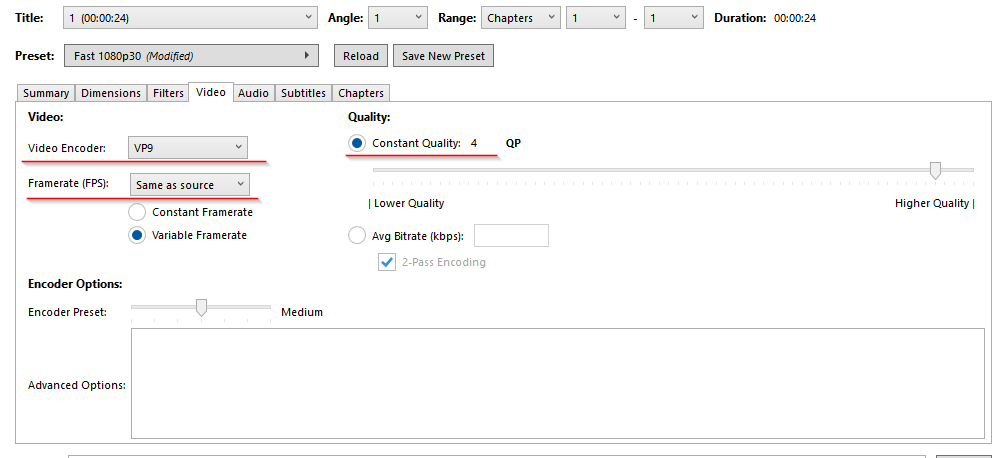
On the Video tab, set:
- Video Encoder: VP9
- Framerate (FPS): Same as source
- Quality: Constant Quality
4. The lower the number, the better the quality.
-
Start the conversion, then upload the new
.webmfile to the Files menu.
Check your work
Even when you follow every guideline, check the result before you assign it to your screens:
- Preview it to see how it plays, page by page. Learn more: Preview
- Run the Content Analyzer on it. It flags elements outside the canvas, missing or oversized files, broken datasource bindings and actions, and suggests devices that can play it. Learn more: Content Analyzer
- On heavy designs, try Performance mode. Learn more: Performance Mode
If a finished item still lags on a device, see Content on my device is lagging.