Register a device
In this article we will show you how to register a device to your customer.
Prepare the device
Network Setup
Set up the network connection (Ethernet or WiFi) on your device. Make sure the device is connected to a stable internet connection.
Install Wallboard Application
Download and install the Wallboard application on your device. This can be done via USB or with other methods, depending on the device type.
Register a device via 4-digit code
After you install the Wallboard application on a device you will see a four digit code on the screen.
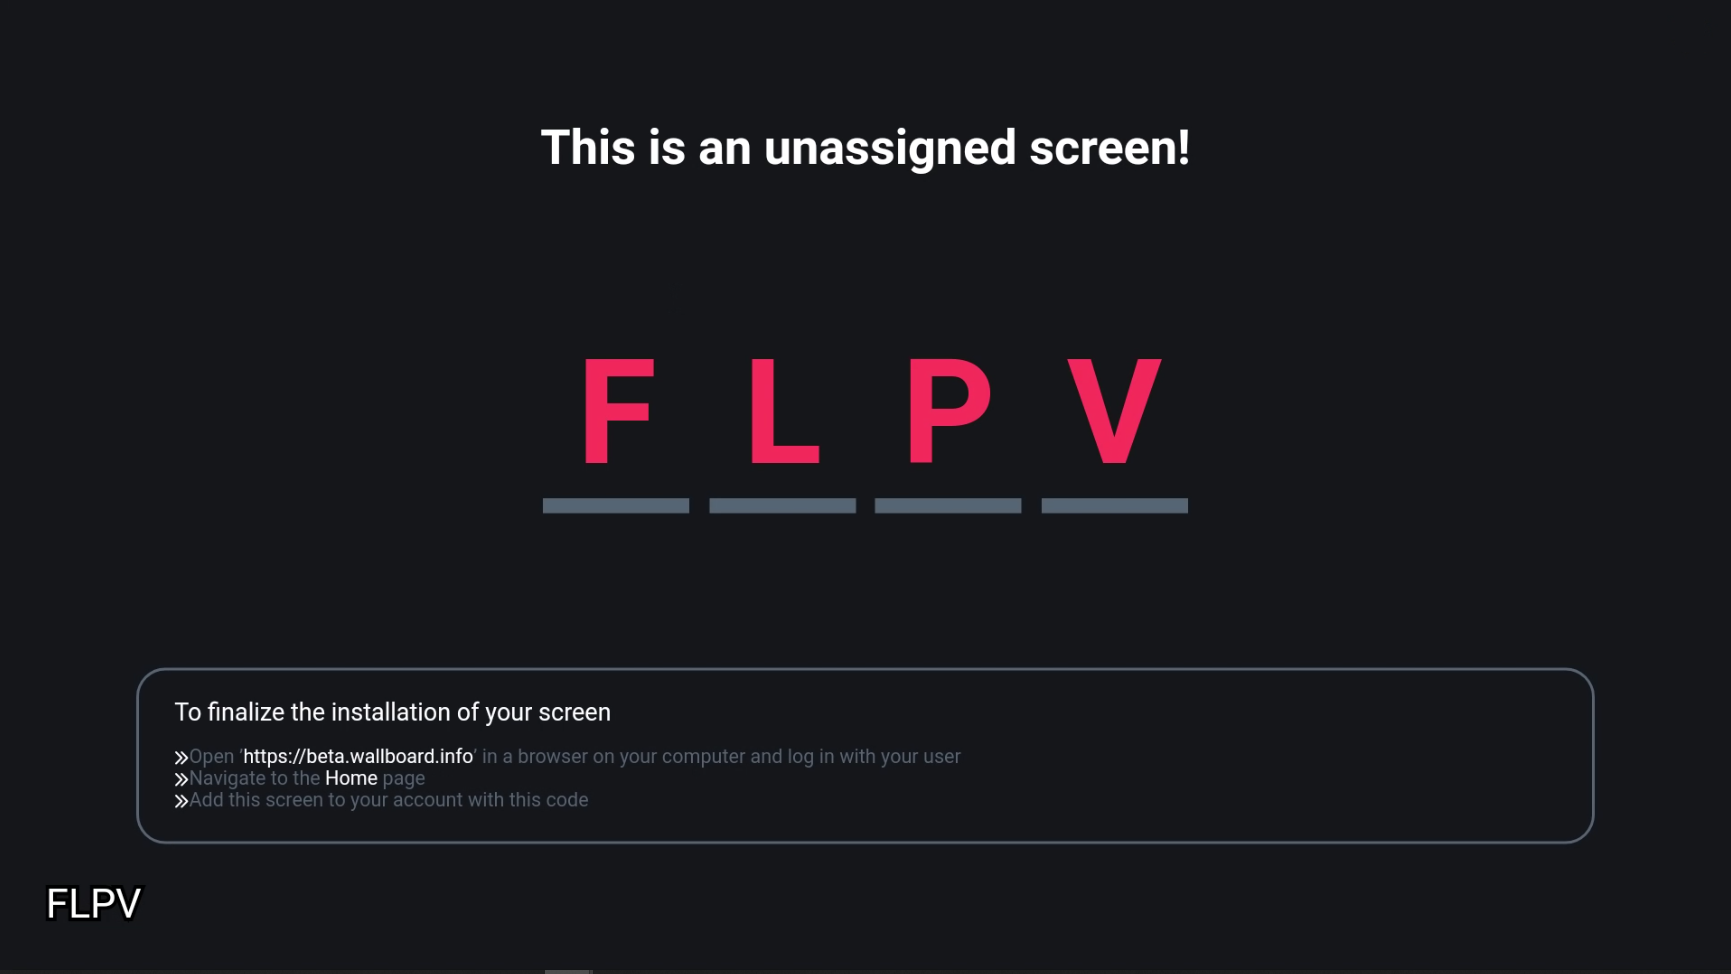
You have to login to the editor interface to add a new device.
- Select the Devices tab on the sidebar or the Quick access bar.
- Click on the button next to the Devices header.
- Select
Add deviceoption to add device
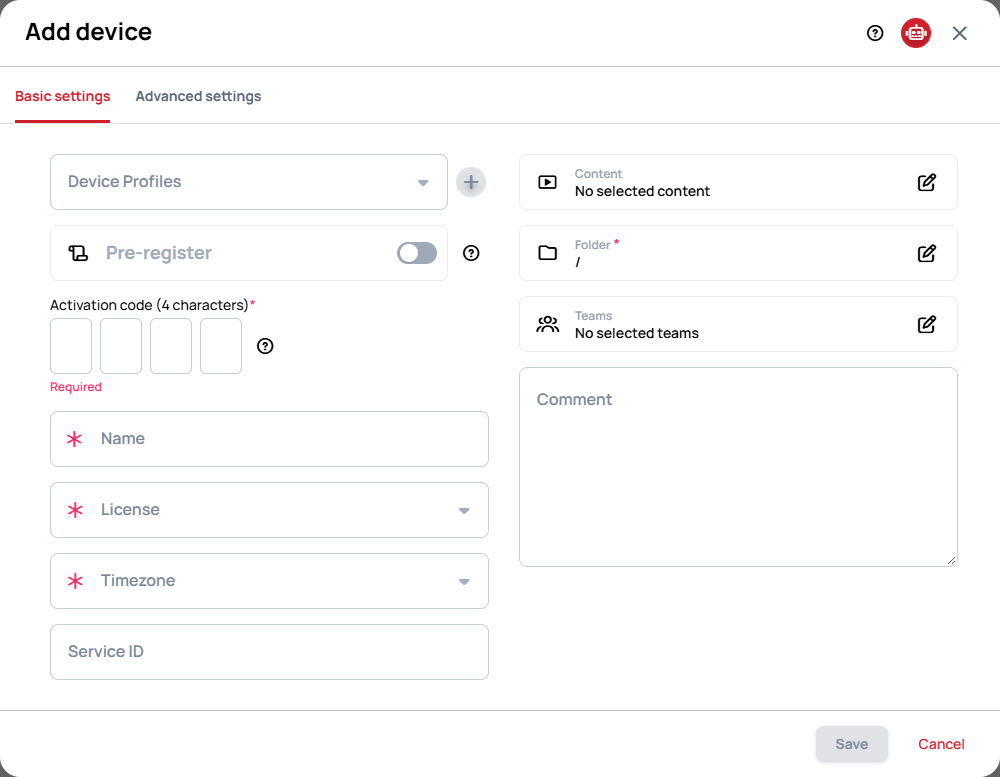
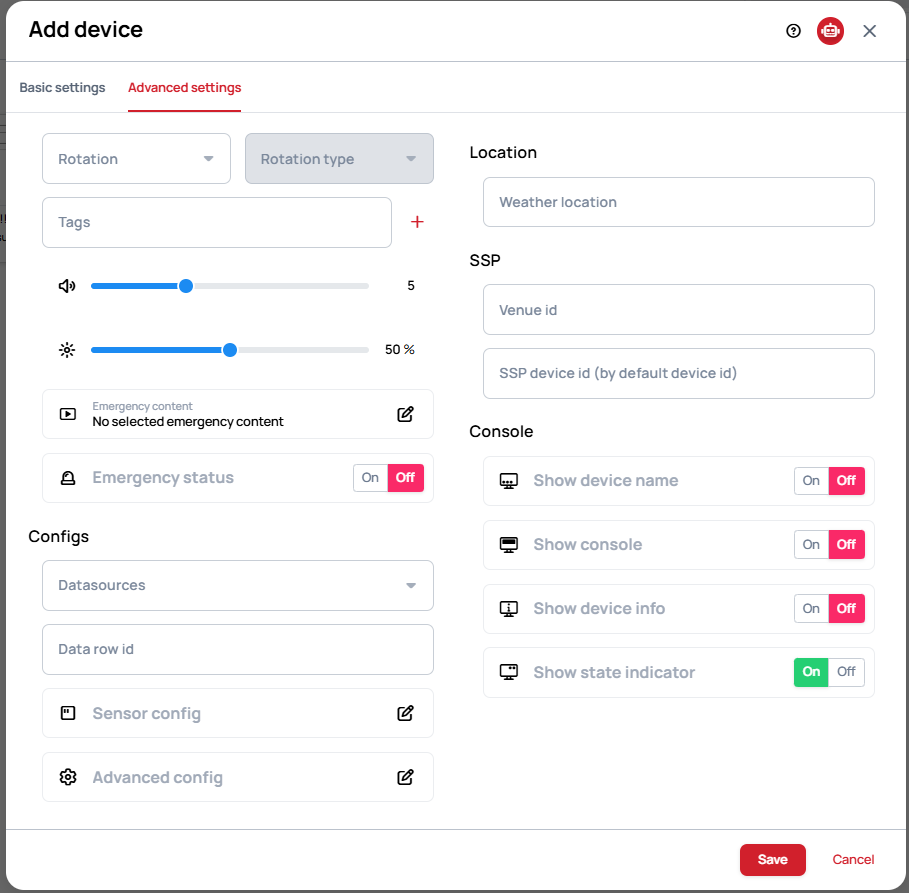
When you click on the Add new button, a modal opens where you fill in the necessary information for the device registration.
The commissioning date is automatically set to the date of registration.
Basic Settings
Basic settings allow you to configure the essential parameters of the device.
Activation code or Pre-register
To register a device, you can choose one of the following methods:
- Register the device now by entering the 4-character code from the device's screen into Activation code (4 characters).
- Switch on Pre-register to create the device in advance. The code field is replaced by an optional Serial number field. See Pre-register a device.
License
Select the license to assign to the device.
- If you want to register a device without license, select the Unlicensed license type
Other
- Name your device
- Assign content to the device at the time of registration.
- Assign teams to manage and view the device.
- This option is available only if at least one team exists. Learn more: Pre-registration
Optional settings
Device Profiles
Device Profiles require predefined rules, which you can create in the Device Profiles menu.
- Only supported by applications with version 4.0 or higher (except the Desktop Broadcast App).
- Selecting a Device Policy will replace all current settings with the configuration specified in the policy.
Learn more: Device Profiles
Pre-registration
Switch on Pre-register to create a device before the physical one is installed. The Serial number is optional, so you can create an empty placeholder with just a name. Learn more: Pre-register a device
Advanced Settings
Advanced settings provide additional configuration options for the device.
Advanced
-
Volume: Set the default audio level for the device. The default value is
5. -
Brightness: Adjust the screen brightness. The default value is
50%. -
Folders: You can choose where to place the device, either in the root folder or in a custom folder.
-
Rotation: Choose between screen rotation or content rotation. Learn more: Rotation Type
-
Emergency Content: Pre-set default emergency content or playlists for the device.
-
Emergency Status: Define whether the device is currently in an emergency state.
Location
-
Time zone (required): Set the time zone for the device.
-
Weather Location: Set weather location for the device.
-
Service ID: A unique identifier (maximum 15 characters) for external services such as TeamViewer. Only administrators can modify this field.
Configs
-
Datasources: Bind a primary datasource to the device. Learn more: Datasources
-
Data Row ID: Assign a primary data row ID for the device's content.
-
Sensor Config: Configure sensors connected to the device. Learn more: Sensor Configurations
-
Advanced Config: Add advanced configurations to the device. Learn more: Advanced Configurations
Console
These options allow you to control how information is displayed on the device.
-
Show Device Name: Display the device name on-screen.
-
Show Console: Enable the device console display.
-
Show Device Info: Show detailed information about the device.
-
Show State Indicator: Display the state indicator for the device.
Add multiple devices in succession
When registering several devices at once, use the Save & add another button next to Save. This submits the current device and immediately reopens the Add device modal with the previous entry's values pre-filled, so you only need to change the fields that differ (such as the Temporary ID / Serial and Name).
- Useful for bulk registration where most settings (license, folder, time zone, content, etc.) are shared across devices.
- The standard Save button works as before, closing the modal after registration.
Register a device via Serial number
Instead of the 4-character code on the device's screen, you can use the device's serial number to register it: switch on Pre-register and enter the Serial number. The device finds its placeholder by the serial number when it comes online.
Not every device can be added via serial number.
Only the ones that report their own serial number (such as LG, Samsung, BrightSign, and some Android devices, such as Qbic).
Pre-register a device
Pre-registration creates a device in Wallboard before the physical device is installed. You can build the customer's whole structure in advance (names, licenses, folders, content and settings) and connect the real devices later.
There are two ways a placeholder gets connected to its physical device:
| With a Serial number | Without a Serial number | |
|---|---|---|
| What you enter | Name, License, Timezone, Folder and the device's Serial number | Name, License, Timezone and Folder only |
| How it connects | Automatically: the device finds the placeholder by its serial number when it comes online | By hand: you pair it with the 4-character code shown on the device's screen |
| Works with | Devices that report their own serial number (such as LG, Samsung, BrightSign and some Android devices, such as Qbic) | Any device |
Pre-registration with a serial number also helps the device find its registration again after a reset or reinstall.
Create a placeholder
- In Devices, click Add new.
- Switch on Pre-register.
- Fill in the required fields: Name, License, Timezone and Folder. Enter the Serial number only if you want the device to connect automatically.
- Click Save.
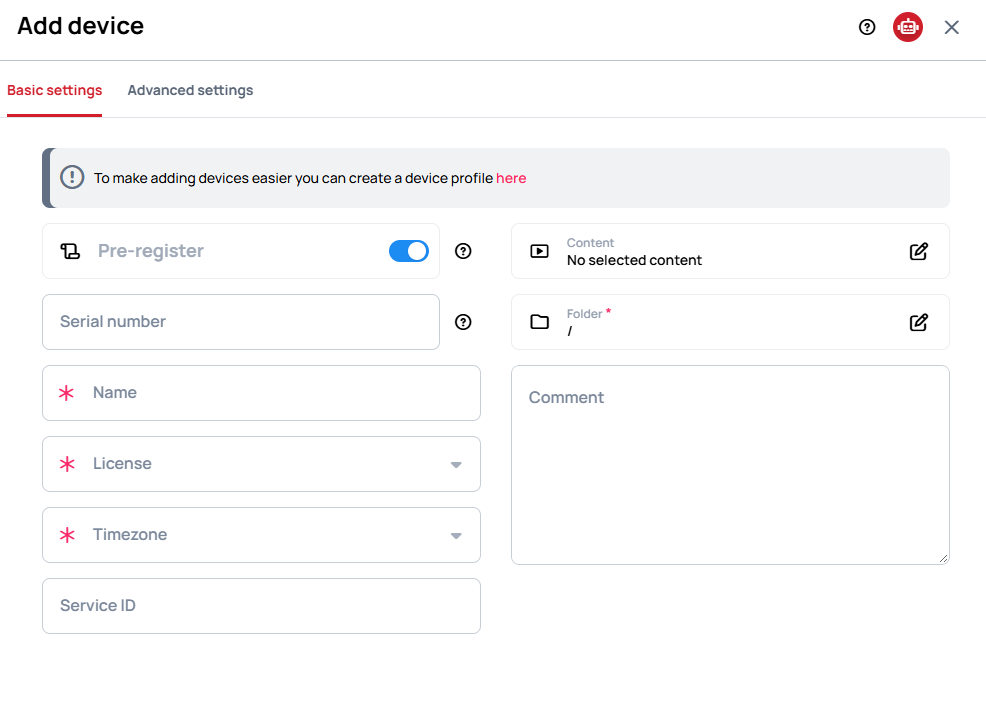
To differentiate pre-registered devices from normal offline devices:

Left: a pre-registered device placeholder (no assigned content yet). Right: a device that has registered and come online.
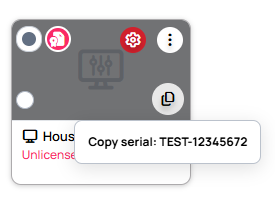
A pre-registered device with a Serial number shows a icon on its card. Hover it to see the serial number, and click it to copy.
Pair a placeholder with its device
When the physical device is installed and shows its 4-character registration code on screen:
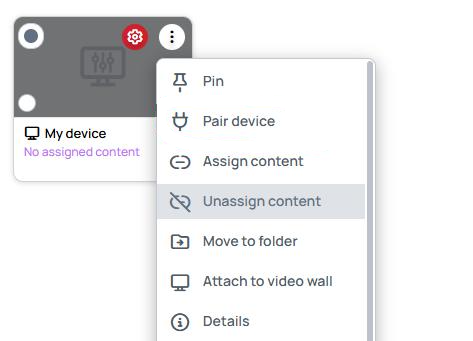
- In Devices, open the placeholder's menu: right-click its card, or click its button.
- Click Pair device .
- Enter the Registration code shown on the device's screen.
- Click Pair.
The physical device takes over the placeholder's name, folder and settings, and replaces it in the Devices list.
- Only a placeholder that has never come online can be paired.
- The physical device must be switched on, showing its code, and not yet registered to any customer.
- Pair device is not available while you are impersonating another user with View as.
After registering: checklist
Once the device shows up in the Devices list, go through these steps before you leave the site.
1. Check that the device is online
- The device's status is online.
- The preview image shows the content you assigned. The device uploads this screenshot every few minutes, so it can be a few minutes old: also look at the physical screen.
2. Set working hours or an automatic reboot
- Set Working hours, so the device does not run 24 hours a day, or at least an automatic reboot.
- Choose the
Turn offtype: Device switches the whole device off, Screen only switches the display off.
3. Schedule client updates
Client updates are set in Update management, separately from Working hours.
- Set the Update period to Scheduled and pick a quiet time.
- Make sure that time falls inside the device's working hours. The device can only update while it is switched on.
For example, if the shop closes at 17:00 and the working hours end at 18:00, schedule the update for 17:30. This way an update never interrupts the screen during opening hours.
4. Check the orientation
- The screen and the content are in the right orientation. Learn more: Display Control
5. Test with real content
- Assign a 4K video, and if the screen is in portrait, a portrait 4K video too.
- If one device drives several displays, test a video at the full combined resolution, which can be wider than 4K.
- If a video does not play or stutters, check the codec. On Android, a WebM file is the safest choice. Learn more:
- If the content looks blurry or does not fit the screen, check the native and web resolution.
6. Get notified when the device goes offline
- Set up a Device offline notification rule, so you know about a problem before someone calls you.
7. Use the on-screen debug options while testing
- Turn on Show state indicator or Show console (see Console above) while you test on site, and turn them off before you leave.
Device-specific guides
Each platform has its own extra steps and limits:
- Android, including Hikvision
- BrightSign, and its content restrictions, such as 4K portrait video on Series 4 players
- Samsung
- LG
- Windows