About our Browser Client
The Browser Client enables running our application on any platform with a standards-compliant Chromium browser, including desktops and mobile devices.
For a full list of supported functions, refer to our Client Platform Comparison Chart.
The Browser Client requires a Chromium version 71+ to function properly.

Installing via URL in browser
- Navigate to 2.0 UI > Settings > Downloads, then click Copy URL in the Browser Client card to open a modal for configuring parameters.
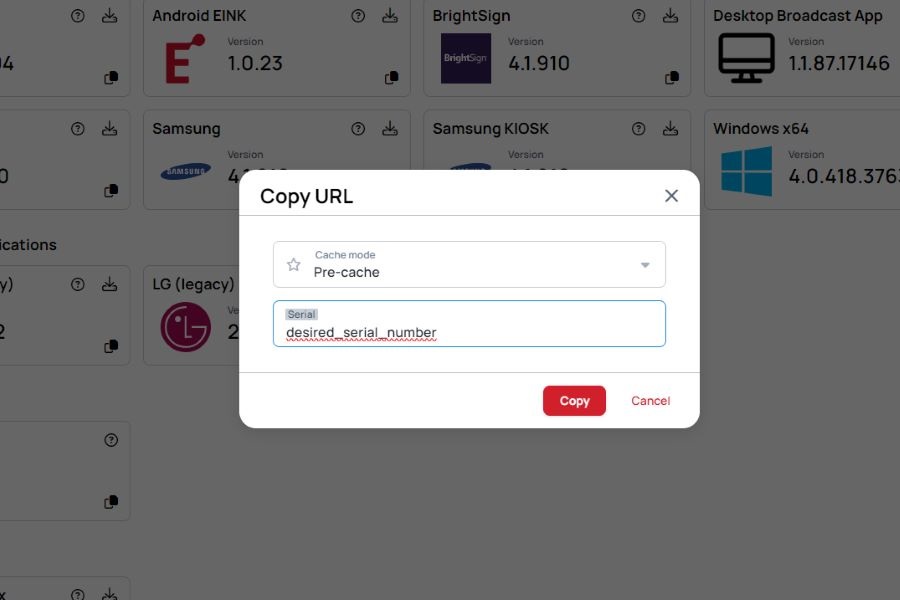
- Click the Copy button to copy the generated link
- Paste this link (Ctrl+V) into a new browser tab, notepad or wherever it will be visible. For example, the link will look like this:
https://editor.wallboard.info/apps/pwa?cacheMode=precache&serialNumber=your_serial_number - Open this link in the device's browser. On the page that appears, click the Install button in the top right corner. An application called Wallboard App will then appear on your device.
- Then close the page in the browser tab.
- Within the Wallboard PWA app, you will see a 4-digit code that you can enter in the Wallboard interface to register your device.
- Add the application to your home screen for easy access and enable Kiosk Mode if needed.
After registering the device with the 4 digit code, you can put the URL as a comment to the screen with Settings > General > Comment
Enhancing Functionality with Wallboard Extension
For additional features, install the Wallboard Extension from the Chrome Web Store. The extension enables:
- CPU Information (temperature, model, count)
- Memory Usage Details
- Preview Image Capture
Customizing with URL Parameters
You can optionally extend the Browser client's URL with URL parameters to customize behaviour.
Cache Behavior
The Browser Client supports two caching modes:
- PreCache: Caches resources before loading and at runtime.
- OnTheFly: Caches resources only during runtime.
To configure, append the appropriate parameter to the URL:
?cacheMode=precache
?cacheMode=onthefly
If not specified, PreCache mode is used.
Serial Number
You can register Browser client in advance utilizing feature outlined in this article
To pre-register the Browser Client in advance, append the serial number parameter:
?serialNumber=your_serial_number
This ensures registration settings are retained, which is useful for devices that reset storage on reboot.
- Each device must have a unique serial number to prevent socket conflicts.
- Pre-register feature has constrains regarding serial number length.
- While using multiple parameters they should be structured as follows:
?cacheMode=desired_cache_mode&serialNumber=desired_serial_number
Configuring URL Parameters via 2.x UI
Navigate to Settings > Downloads, then click Copy URL in the Browser Client card to open a modal for configuring parameters.
Browser Client on ChromeOS
For more details on ChromeOS compatibility, refer to the Client Platform Comparison Chart.
Steps for Deployment
Navigate to Device Management
- Open your browser and go to the Google Admin Console.
- Log in using your administrator credentials.
- From the Admin Console home page, click on Devices.
- In the left-hand menu, click on Chrome to access Chrome device settings.
- Under Chrome management, click on Apps & extensions.
- Select Kiosks from the menu at the top.
Adding the Browser Client
- Click on the yellow + button at the bottom right to add a new app or extension.
- Select
Add by URLoption. - Enter the URL of the Browser Client. Example:
https://<your-server>/apps/pwa/ - Click Save.
Configure Installation Settings
- Installation policy:
- Select
installedto ensure devices will have the app installed on them after assigning to Organizational Unit.
- Select
- Kiosk Settings:
- Enable
Allow App to Manage Powerthis option allows apps to manage devices power state. - Enable
Enable Device Attributes APIthis permits the app to query additional information about the device.
- Enable
- Auto-Launch Kiosk App Settings:
Enable Health Monitoringshould be enabled.- Screen Rotation should be set to
Allow device to set.
Adding extension
- Under Extensions click on
ADD EXTENSIONand selectAdd from Chrome Web Storewhich should open chrome web store where you can search either by nameWallboard Extensionor by IDjiagglaoghkmmihcofpmikhpbikdipeb. - Once found click
Selecton the top right of the window to add the extension. - Click Save in the top right to save changes.
Configure automatic start on devices
- Under apps & extensions, select Kiosks on the top bar and the Organizational Unit on the left you want to configure it to.
- In the
Auto-Launch Appoption select Wallboard Browser Client. - Devices added to the configured Organizational unit with Kiosk & Signage upgrade should now start the app upon startup.
Device enrollment
During the initial setup of your ChromeOS device, follow these steps to complete enrollment:
- Select Device enrollment when prompted (typically found in the bottom-left corner of the screen).
- Sign in using the Google account credentials of a user within the appropriate organizational unit.
- Choose the Enroll kiosk or signage device option.
- In the Google Admin console, navigate to the Devices section, locate your device, and move it to the desired organizational unit.
- The device will automatically receive any policies previously configured for that organizational unit.
Configuring Working Hours & Power Settings in Google Admin Console
To configure sleep mode for ChromeOS devices:
- Go to Devices > Chrome > Settings.
- Switch to the Device settings tab.
- Under Kiosk Power Settings:
- Set Action on Idle for AC & Battery Kiosk Power Settings to
Do Nothing.
- Set Action on Idle for AC & Battery Kiosk Power Settings to
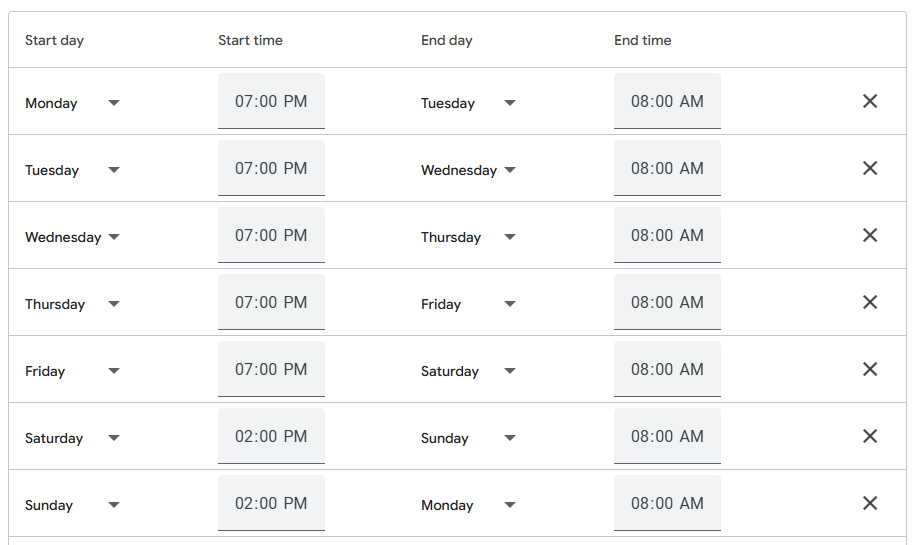
- Configure Device Sleep Mode:
- Define start and end times for sleep cycles.
In the example below the device would wake up every day at 8:00AM and go to sleep at 7:00PM on weekdays and 2:00PM on weekends:
ChromeOS Flex for Linux-based Solutions
For users looking for a Linux-based solution, we currently do not provide a native application. However, there are alternative approaches that may fit your needs.
One of the best alternatives is ChromeOS Flex, which offers:
- Centralized management through Google Admin Console.
- Easy deployment and bulk enrollment for devices.
- Frequent security updates with built-in security features.
- Low system requirements, making it suitable for repurposing older PCs and Macs.
- Seamless Google Workspace integration.
- Cost-effectiveness, as it is free to install and optimized for web applications.
Please note that enterprise usage of Chrome OS Flex may involve additional fees.
Our Browser Client works seamlessly on ChromeOS and can be installed as a standalone application, ensuring a smooth experience for digital signage deployments.
Alternatively, Browser Client can still be utilized via a standard browser. However, keep in mind that after a system restart, the browser may need to be manually launched unless automated scripting is implemented.