Form app
This article introduces you to our custom Form app and its core features.
The Form app is deployed to customer servers per request. To learn more contact our support at sales@wallboard.info!
What is Form?
With the Form custom app you can create highly customizable forms that you can deploy to various kiosk interfaces to collect the necessary information from people. You can fully tailor the 20+ available input types to your needs whether you want to collect information during an ordering process, collect email addresses for a newsletter or just simply create a customer feedback form.
Prerequisites
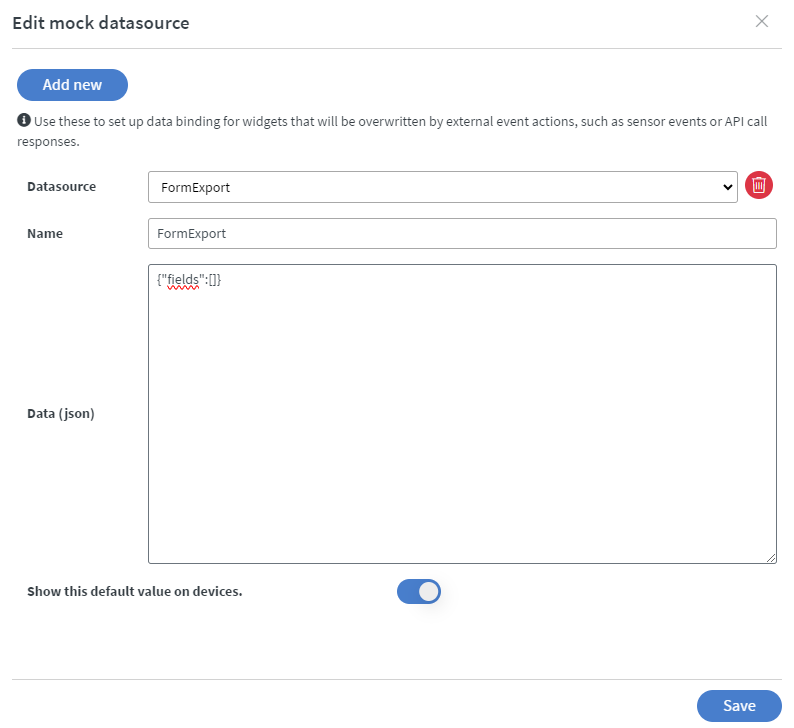
To utilize the functions of the Form app you first need to create a mock datasource that will serve as a "virtual database" so all data submitted via the forms can be
stored or passed over to a third party system. To create a mock datasource navigate to Content > Base data path > Edit mock datasources. You can create a more complex structure
or just use a simple {"fields":[]} json data format.
Values are stored as text or number, images are stored in base64. If you choose to use complex export type, ALL parameters from the form widget will be stored like minimum/maximum range along with the actual value provided by the user.
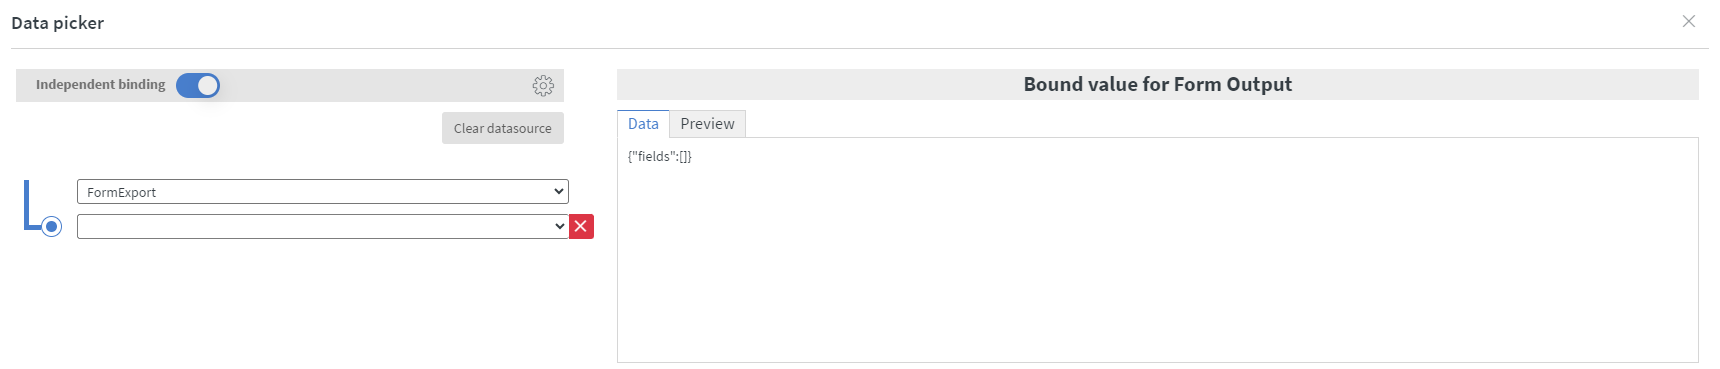
Setting up the widget
After creating the mock datasource you need to select a form widget and bind a datasource as output.
- Form output: This is the mock datasource your form outputs all its data into.
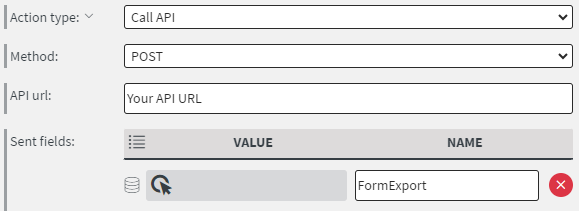
What to do with the collected data?
The collected data can be passed onto a third party system or inserted into an internal datasource.
- To send the data to a third party set up a Call API action with the POST method and specify the name of your mock datasource in a Data field. Some useful third party services we recommend for processing your data and creating automations: N8N, Google Apps Script.
- To insert your data into a datasource create an Insert to internal datasource array action.

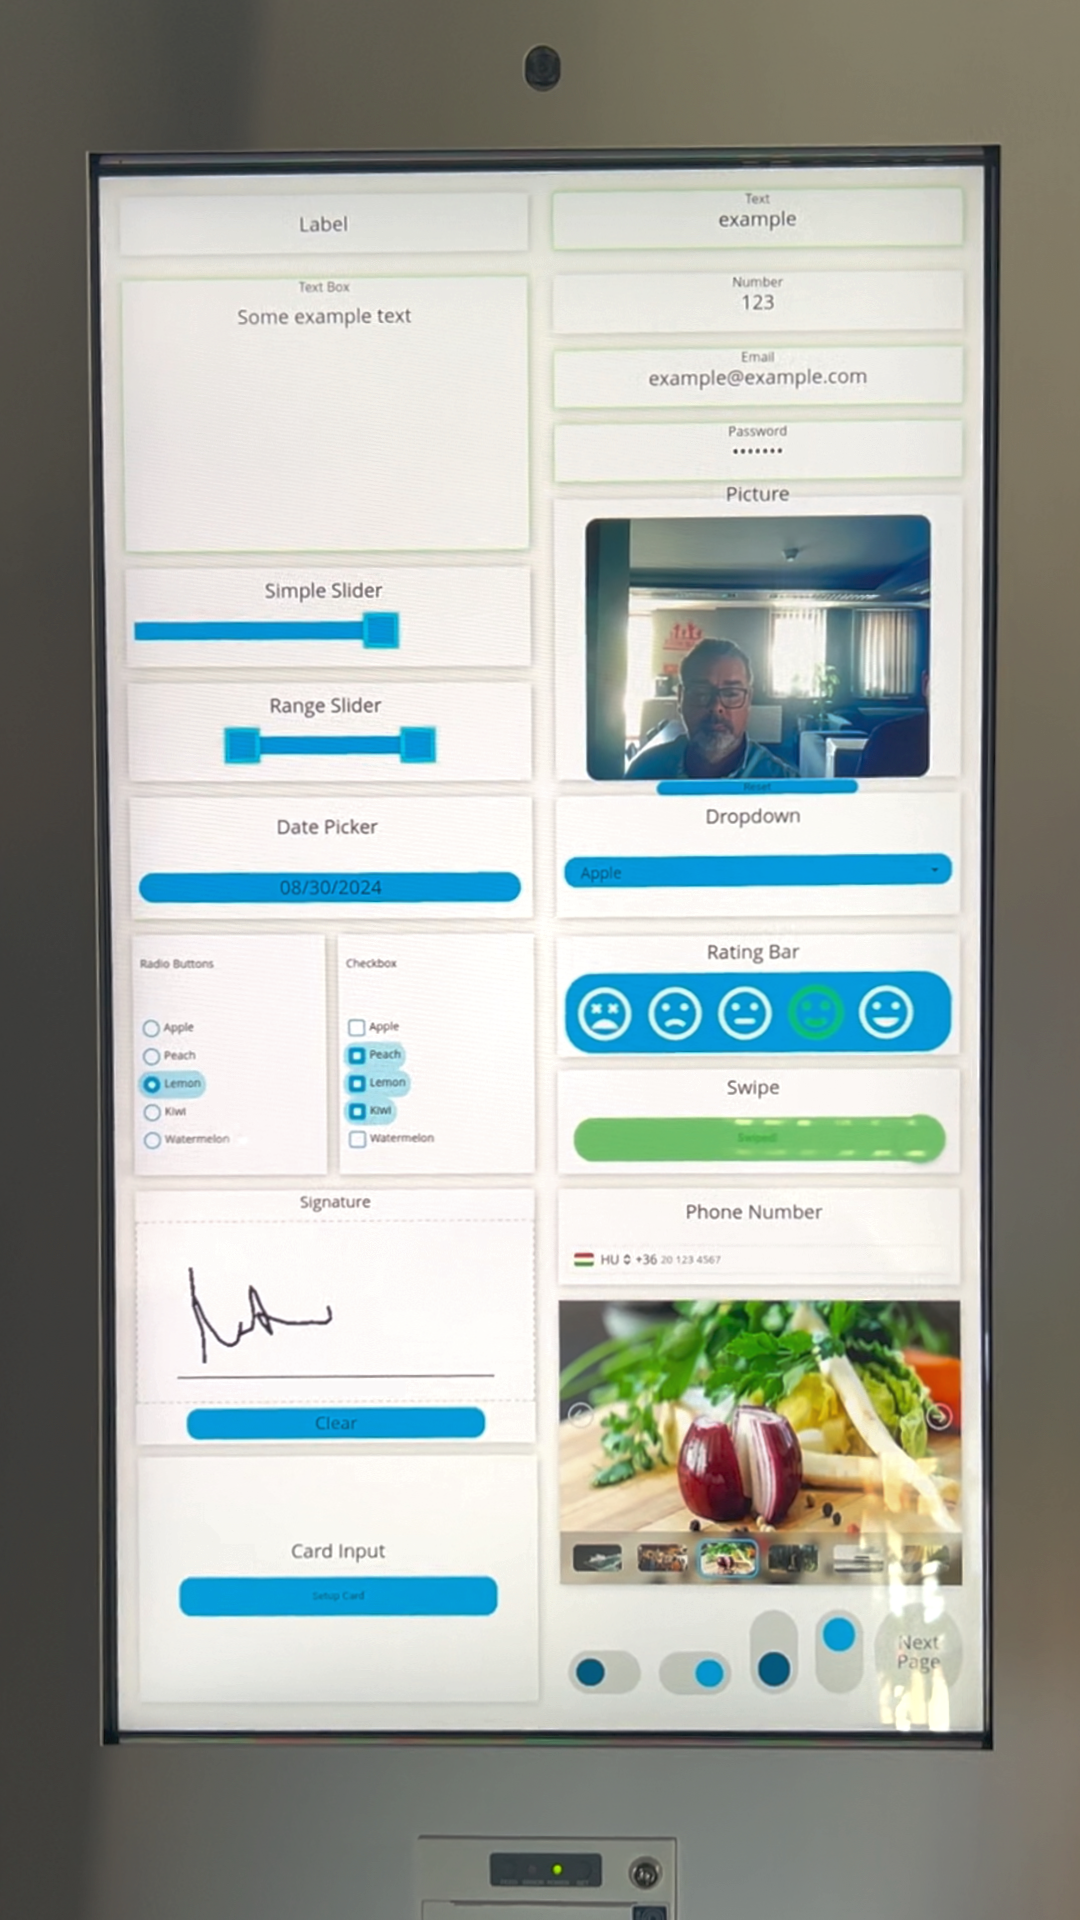
Form types
Interactive
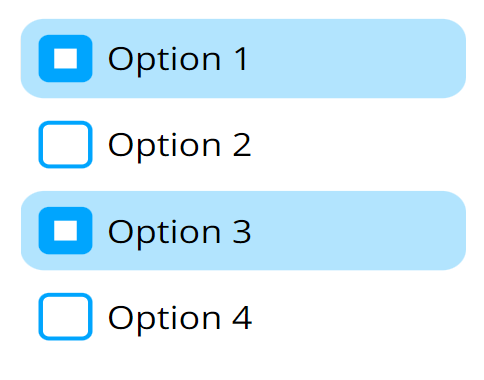
- Checkbox
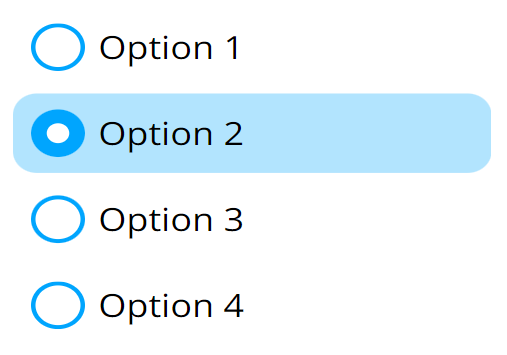
- Radio button
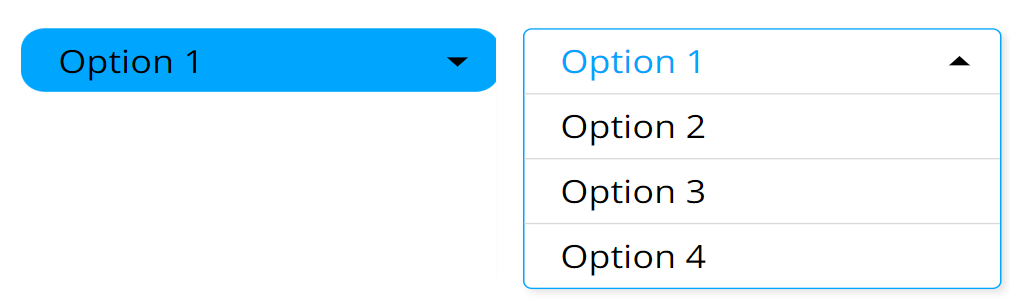
- Dropdown
- Image selector
- Picture
- Rating bar
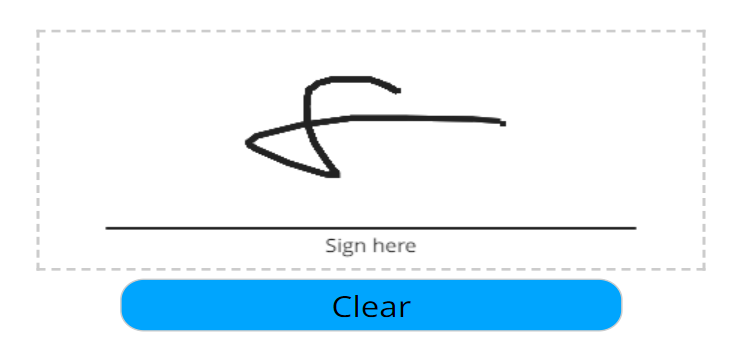
- Signature
- Switch
- Swipe
With the checkbox type form you can select multiple items at once from a list. In the settings you can set the given items and have some general formatting options.
With the radio button type form you can select a single item from a list. In the settings you can set the given items and have some general formatting options.
With the dropdown type form you can select a single item from a dropdown list. In the settings you can set the given items and have some general formatting options.
With the image selector type form you can select one image from a gallery of images.

With the picture type form you can take a photo with the built-in or external camera of your device and it will be uploaded as a base64 encoded image.

With the rating bar type form you can select a value between 1-5 represented by different icons. In the settings you have some general formatting options.

With the signature type form you can draw your signature and collect it as an image in base64 format. In the settings you have some general formatting options.
With the switch type form you can collect information whether a switch has been toggled or not. In the settings you have some general formatting options. You can make it round if you apply rounding in the widget's other settings.

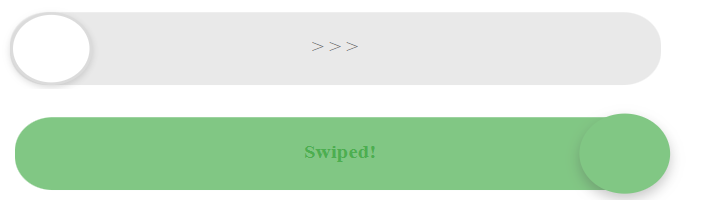
With the swipe type form you can collect information whether it has been swiped or not. In the settings you have some general formatting options.
Value input
- Card
- Date
- Number
- Password
- Phone
- Slider
- Text
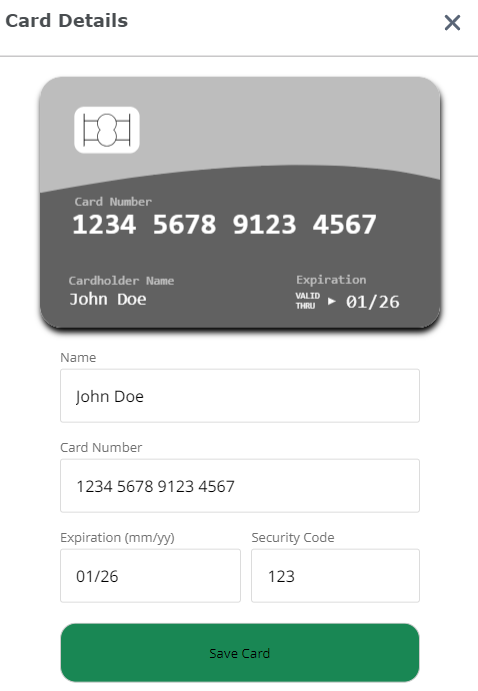
With the card type form you can input credit card details: name, card number, expiration and CVC.
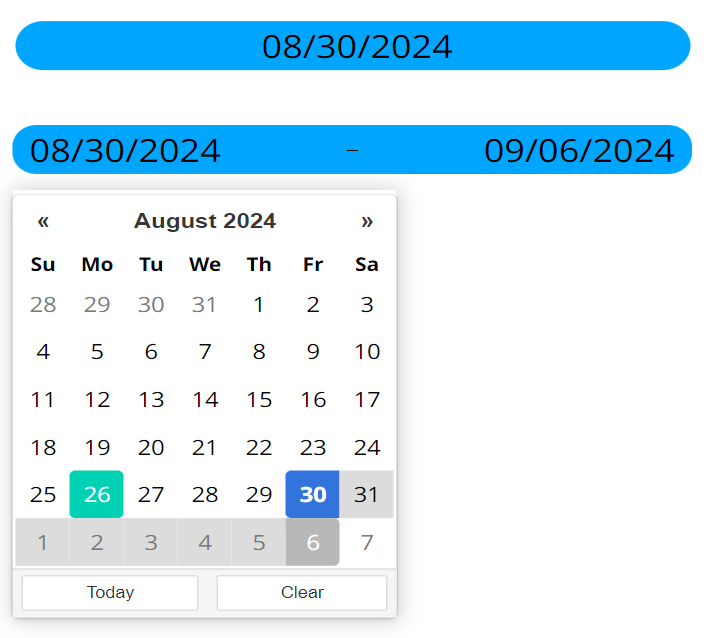
With the date type form you can select a specific date or a range. In the settings you can find various options like position, language, show clear button, show today button and many other formatting options. There are two types of date forms. Date and date range.
With the email type form you can input an email address and the format will be automatically checked.

With the number type form you can input a number and set requirements for it in the settings.

With the password type form you can input a password and set the requirements for it in the settings.

With the phone type form you can input a phone number and have the option to toggle the country selector.

With the slider type form you can select a number value or a range. In the settings you can set up a minimum/maximum value, steps, default values and formatting. There are two types of slider forms. Simple slider and Range slider.

With the text type form the user can input any text within the character limitations set up in the settings. You can capitalize the text and even specify a mask so the text will be formatted. There are two types of text forms. Text and text box.

Static
- Label
With the label type form you can display a value that was entered into a form widget on a different page of your content.
General settings
- General settings: Specify the name your widget will be stored as in the database, set a placeholder, set alignment, choose whether the field is required or not and show or hide the placeholder label.
- Font settings: Set a font family, font size, style and color.
- Error settings: Show or hide validation and error messages, set alignment and colors for them.
Sensor events
- Valid/invalid sensor events are sent on every change along with the name property. If your property name is for example
testRadioButtonthen atestRadioButton-validsensor event will be sent out. - A sensor event is also sent out based on the
nameproperty set for the widget along with the input value.
This custom app is under active development and any information in this documentation could be inaccurate or outdated! If you have any questions please contact our support at support@wallboard.info