Amadeus Event datasource
The Amadeus Event datasource connects Wallboard to the Amadeus Hospitality event management platform and retrieves the scheduled events for a specific property for an upcoming number of days. Use it to drive event reader boards, daily event listings, and lobby or meeting-room displays that show what is happening at a venue.
It is an external datasource that authenticates through an Amadeus cloud credential and refreshes on a schedule (once per day by default).
Prerequisites
Before creating an Amadeus Event datasource, ensure you have:
- An Amadeus Hospitality account with API access enabled
- Your Amadeus Client ID, Client secret, and Subscription Key (provided by Amadeus or your Amadeus representative)
- A Wallboard account with permission to create cloud credentials and datasources
Create the Amadeus cloud credential
The datasource needs an Amadeus credential to authenticate with the Amadeus API.
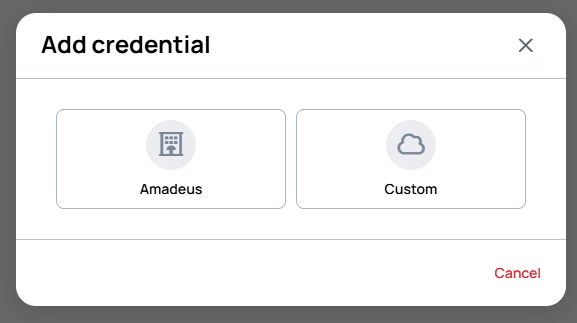
- Navigate to Settings >> Cloud Credentials
- Select the Other tab
- Click Add credential and select Amadeus as the credential type
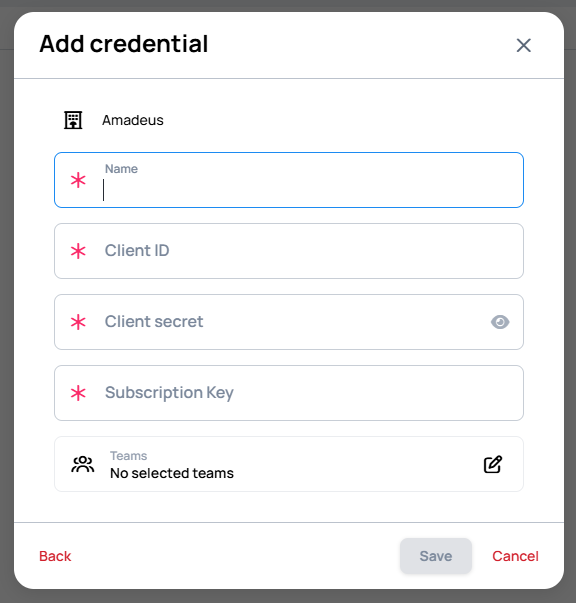
- Fill in the required fields:
- Name — a name for the credential
- Client ID — your Amadeus API client identifier
- Client secret — your Amadeus API client secret
- Subscription Key — your Amadeus API subscription key
- Click Save
The credential obtains an access token from Amadeus that is refreshed automatically as it expires. See Other credentials for general information about custom credential types.
Create the Amadeus Event datasource
- Go to Settings >> Datasources >> External datasources and click Add new
- On the Choose a datasource type screen, select Amadeus event
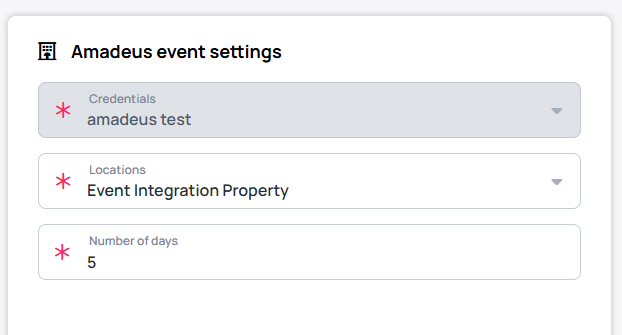
- In the datasource editor, fill in the Amadeus event settings panel (left side):
- Credentials — select the Amadeus credential you created above
- Locations — choose the property whose events you want to display. The dropdown lists the properties available on the selected credential.
- Number of days — how many upcoming days of events to retrieve (for example,
5)
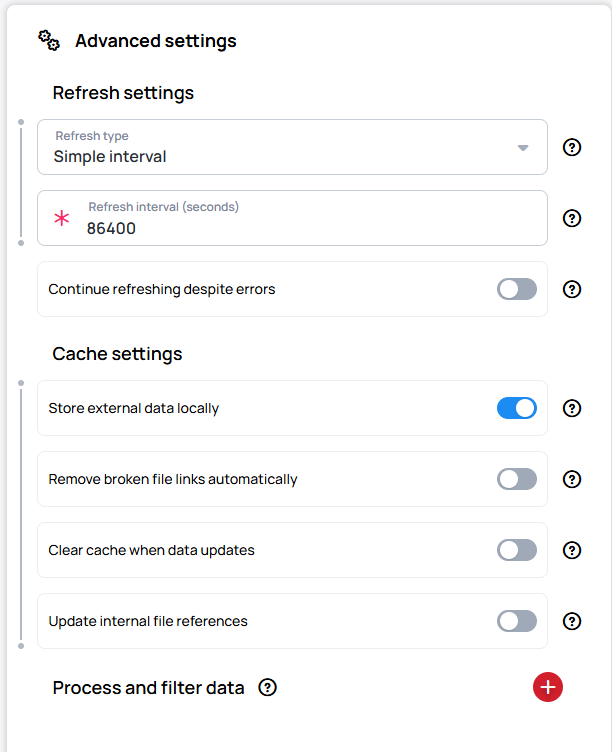
- In the Advanced settings panel (middle), the Refresh interval (seconds) under Refresh settings defaults to
86400(once per day) — change it if you want a different refresh cadence. See External Datasources for the full list of advanced and cache settings.
- Save the datasource using the save icon in the top toolbar
Verify your setup
After saving:
- The Preview panel (right side of the editor) populates with the returned events — confirm events are listed for the configured location and date range, and that the names, rooms, and times match what is scheduled in Amadeus
- In the datasource list, the datasource status should show as Active
Event data structure
The datasource returns an events array. Each event contains the following fields (example values shown):
{
  "events": [
    {
      "id": "xxxx...xxxx",
      "name": "Morning - Day 1",
      "bookingPostAs": "Annual Conference 2026",
      "functionRoomName": "Maple Room",
      "eventClassificationName": "Breakfast",
      "bookingTypeName": null,
      "locationName": "Downtown Conference Center",
      "description": null,
      "startTimestamp": 1777291200000,
      "endTimestamp": 1777294800000,
      "agreedAttendance": 40,
      "estimatedAttendance": null,
      "forecastedAttendance": 30,
      "guaranteedAttendance": 30,
      "setAttendance": null,
      "isPosted": true,
      "alternateName": null,
      "alternateBookingPostAs": "Conferencia Anual 2026",
      "alternateFunctionRoomName": "Room2"
    }
  ]
}
Display the event data
Bind the datasource to a widget to display the event list:
- Table widget — use data binding with the pivot set on the
eventsarray to lay out columns such as the event name (name), room (functionRoomName), and start/end time. See the Table widget. - Readerboard widget — the purpose-built Readerboard app for lobby and room event boards. If your server includes the Readerboard app, connect the datasource through its Set data source property.
Like other external datasources, an Amadeus Event datasource is automatically deactivated after a period of no device usage to preserve performance. Its data and configuration are retained. See External Datasources for details, or enable Prevent auto-deactivation to keep it always active.