Screenshot datasource
Screenshot datasources allow you to capture and display images of web pages, applications, or any URL-accessible content directly in your widgets and templates. The system automatically generates screenshots at specified intervals and makes them available for dynamic content display.
Prerequisites
Before creating a Screenshot datasource, ensure you have:
- Valid URLs that are publicly accessible or properly authenticated
- Understanding of the target page layout and content
- Proper network access from the Wallboard server to the target URLs
- Knowledge of any authentication requirements for protected pages
- Consideration of page loading times for dynamic content
Supported Screenshot Features
The Screenshot datasource supports:
Image Formats:
- PNG or JPG format selection via Image Format switch
- PNG format for high-quality screenshots
- JPG format for smaller file sizes
- Configurable resolution and viewport sizes
- Cropping capabilities for specific page sections
- Custom headers for authentication
Limitations:
- Maximum of 5 screenshots per datasource
- Wait times between 2000ms (2 seconds) and 25000ms (25 seconds)
- Some dynamic content may require longer wait times to load
Create datasource
Go to the Datasources > Click on the Add new inside the External datasource tab > Choose the Screenshot type.
- You have to decide how your datasource updates from the original source, either by selecting a
Refresh Frequencyor by specifying aCron Expression - You can also assign teams to the datasource if necessary.
For more information about external datasource refresh options, see the External Datasource Refreshing documentation.
Configuration Options
When adding a new screenshot to your datasource, configure the following settings:
Basic Settings
URL
- Enter the complete URL to capture a screenshot from
- Must include the protocol (http:// or https://)
- Ensure the URL is accessible from your Wallboard server
- Examples:
https://example.com,https://app.example.com/dashboard
Image Format
- Choose between PNG or JPG format for the screenshot output
- PNG: Higher quality, larger file size
- JPG: Smaller file size, suitable for most use cases
Image Width
- Define the viewport width for the screenshot capture
- Default value: 1280 pixels if not specified
- Range: Typically 320px to 1920px for optimal results
- Consider the target content layout when setting width
Image Height
- Define the viewport height for the screenshot capture
- Default value: 720 pixels if not specified
- Range: Typically 240px to 1080px for optimal results
- Use appropriate height to capture desired content area
Authentication Settings
Headers
- Add custom HTTP headers for authentication or configuration
- Useful for accessing protected pages or APIs
- Format: JSON object
{"Authorization":"Bearer token123"} - Common headers: Authorization, Cookie, User-Agent, API-Key
- Example:
{"Authorization":"Basic dXNlcjpwYXNz", "User-Agent":"Wallboard-Screenshot"}
Timing Settings
Wait Time (ms)
- Time to wait before capturing the screenshot
- Allows page content to fully load
- Range: 2000ms (2 seconds) to 25000ms (25 seconds)
- Default: 2000ms (2 seconds) if not specified
Crop Settings
Crop functionality allows you to capture specific sections of a webpage instead of the entire viewport:
Start Coordinates (X, Y)
- Start X: Left boundary of the crop area (horizontal offset)
- Start Y: Top boundary of the crop area (vertical offset)
- Values in pixels from the top-left corner of the original screenshot
End Coordinates (X, Y)
- End X: Right boundary of the crop area
- End Y: Bottom boundary of the crop area
- Values in pixels from the top-left corner of the original screenshot
Crop Examples:
- Header only: Start X,Y: 0,0 - End X,Y: 1280,100
- Center content: Start X,Y: 200,100 - End X,Y: 1080,620
- Sidebar section: Start X,Y: 0,100 - End X,Y: 300,720
- Square crop: Start X,Y: 0,0 - End X,Y: 500,500
The cropped image dimensions will be: (End X - Start X) × (End Y - Start Y) pixels.

Advanced Settings
Active
- Enable or disable individual screenshots within the datasource
- Useful for temporarily excluding specific screenshots without deletion
- Inactive screenshots won't be captured during datasource updates
Ignore Error Counter
- Continue capturing other screenshots even if one fails
- Prevents a single failed screenshot from stopping the entire datasource
- Essential for maintaining reliability when monitoring multiple URLs
Cache External Resources
- Cache images, CSS, and JavaScript files from external sources
- Improves screenshot consistency and loading speed
- Reduces dependency on third-party resource availability
Remove Broken External Resource References
- Automatically handle missing external resources
- Prevents screenshot failures due to unavailable assets
- Maintains visual consistency when external resources are unavailable
Rotate Cache on Every Update
- Clear cached resources on each datasource update
- Ensures screenshots reflect the latest page content and resources
- May increase loading times but improves accuracy
Exchange Internal Resource References
- Replace relative URLs with absolute URLs for better compatibility
- Helps ensure proper resource loading across different environments
Request Settings
- Configure additional HTTP request parameters
- Set custom timeouts, retry policies, and SSL verification options
- Advanced configuration for specific network requirements
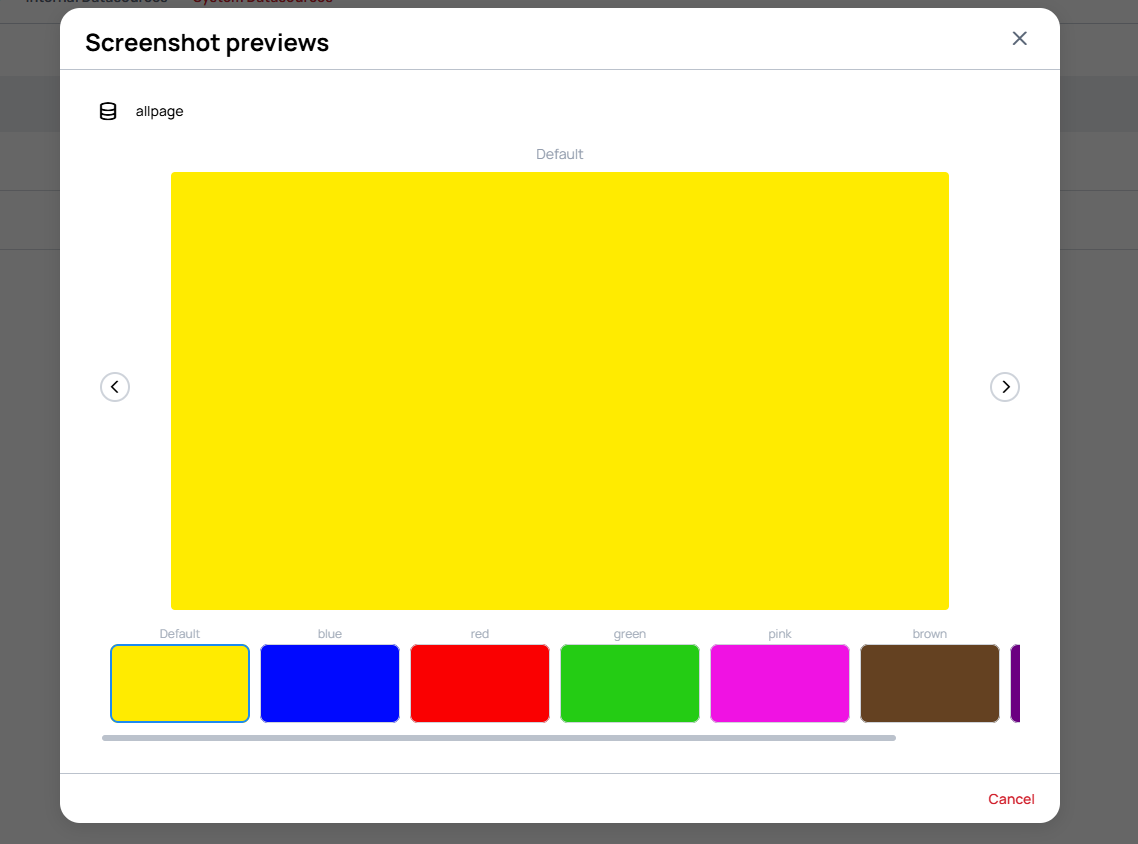
Screenshot Image Viewer
After your Screenshot datasource captures images, you can preview them using the Screenshot Image Viewer:
Accessing the Image Viewer
- Navigate to the Screenshot datasource in the Datasources menu
- Click on the preview/view icon to open the Screenshot previews modal
- The viewer displays all captured screenshots from the datasource
Image Viewer Features
Screenshot Selection
- Dropdown selector at the top to choose which screenshot to preview
- Shows the datasource name or screenshot identifier
Main Preview Area
- Large preview display of the selected screenshot
- Navigation arrows (< >) to browse through screenshots sequentially
- Click arrows to move between previous and next screenshots
Thumbnail Carousel
- Bottom carousel showing all screenshots with labels
- Click any thumbnail to jump directly to that screenshot
- Visual overview of all captured images in the datasource
- Thumbnails labeled with screenshot names or identifiers
Using Screenshot Data in Widgets
Once your Screenshot datasource is created and active, you can use the captured images in various widgets:
Image Widget
- Display screenshots directly using the datasource path
- Example:
{{datasource.screenshot_name.image}} - Supports automatic refresh based on datasource update frequency
Common Use Cases
Dashboard Displays
- Show external dashboards or control panels
- Display third-party analytics or monitoring tools
- Create unified views of distributed systems
Content Preview
- Show previews of web applications or tools
- Display live content from external sources
- Create visual catalogs of web resources
Tips for Optimal Screenshots
URL Configuration:
- Use specific page URLs rather than generic domain names
- Include necessary parameters for proper page display
- Test URLs in a browser to verify accessibility
Timing Optimization:
- Increase wait times for JavaScript-heavy pages
- Consider page loading patterns when setting wait times
- Monitor screenshot quality and adjust timing as needed
Resolution Settings:
- Match viewport size to the target content layout
- Use standard screen resolutions (1280x720, 1920x1080)
- Consider the final display size when choosing resolution
Authentication:
- Use session cookies or API tokens for protected content
- Test authentication headers before deploying
- Consider token expiration and renewal requirements
Save and Activate
Once all configuration is complete:
- Review Settings: Verify all URLs, dimensions, and timing settings
- Test Configuration: Use the preview function if available
- Save Datasource: Click the
Savebutton to store your configuration - Monitor Performance: Check the first few captures for quality and timing
- Adjust as Needed: Fine-tune settings based on initial results
Your Screenshot datasource will now capture images according to the specified refresh frequency or cron expression, making them available for use in your widgets and templates.