Settings - Users
The Users Menu is your central hub for managing user accounts in your Wallboard system. Whether you need to add new team members, update existing accounts, or customize what users can see and do, this interface provides all the tools you need in one convenient location.
To access the Users Menu: System Admin > Users
Interface Overview
The Users interface provides a comprehensive view of all user accounts in your system. The main interface displays a list of existing users with their names, email addresses, roles, and status indicators. At the top, you'll find the Add User button and search functionality to help you manage your user base efficiently.
Finding Users
For systems with many users, you can:
- Use the search bar to find users by name or email
- Sort the user list by clicking column headers
- Filter by role or status using dropdown menus
Setting Up New Users
Adding a New User
Creating a new user account is straightforward:
- At the top of the interface, you'll find the Add User button to create new accounts.
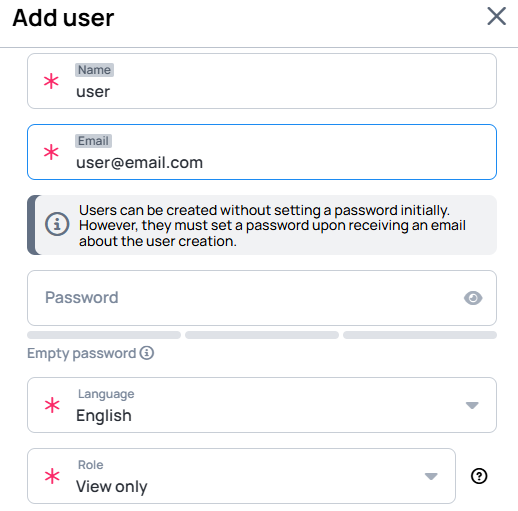
- Fill in the user information:
- Name: Enter the person's display name as it should appear in the system
- Email: This serves as their login username and where system notifications are sent
- Password: You can either set a specific password or leave this empty
- Role: Choose the appropriate access level for this user
Optional Settings:
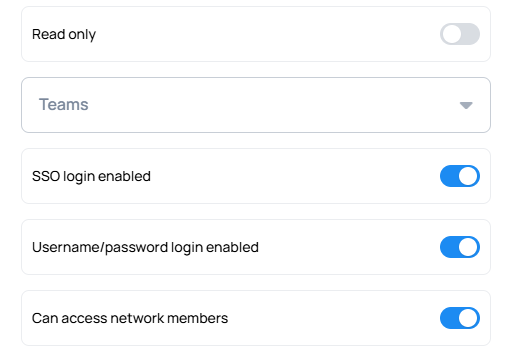
- Read only: User can view content but cannot make any changes or modifications to the system
- Teams: Assign the user to specific teams for organized access control and collaboration
- SSO login: Enable Single Sign-On authentication, allowing the user to log in using their organization's identity provider
- Username Password: Allow traditional username and password login authentication for this user
If you disable both SSO and Username Password authentication, the user will be unable to access the system.
- Click Save to create the account
Password Setup Options
You have two ways to handle passwords for new users:
Set a Custom Password
- Enter a password manually in the password field
- You'll need to communicate this password to the user separately
- The user can change it later through their account settings
Reset Password
- Leave the password field empty
- The system will automatically send an email about password changing to the user
- The user will set their own password when they first access the system
- No temporary credentials are sent for security
Contact support if email delivery issues persist.
This ensures users create their own secure passwords and reduces the risk of credential sharing.
Understanding User Roles
When setting up users, you'll need to assign them a role that determines what they can access and do in the system:
| Role | What They Can Do |
|---|---|
| View Only | View content and schedules but cannot make changes |
| Content Editor | Create and modify content, but publishing requires approval |
| Content Manager | Full control over content including publishing and scheduling |
| Technical Manager | Manage devices and system configuration settings |
| Administrator | Complete access to all system features and settings |
Choose the role that best matches the person's responsibilities and the level of access they need.
Start with the most restrictive option that meets the user's needs. You can always increase permissions later as responsibilities grow.
Learn more: User Roles
Managing Existing Users
Editing User Information
To update an existing user's information:
- Find the user in the Users list
- Click the next to their name
- Update any fields as needed:
- Name and email address
- Password (enter new password, administrator only, for users it can be done in Profile settings)
- Role assignment
- Restricted status
- Click Save to apply changes
Changes take effect immediately. If you reset a password, the new credentials will be sent to the user via email.
Customizing User Interface Access
Beyond basic roles, you can fine-tune what each user sees in their interface:
- Click User Interface Profile Settings for any user
- Configure visibility for specific features and menu items
- Save your changes
This feature allows you to create a customized experience for each user, showing only the tools and features relevant to their work. For example, you might hide certain administrative menus from content editors or remove advanced features from view-only users.
User Interface Profiles are particularly useful when you have users with specialized roles or when you want to simplify the interface for specific team members.
Learn more about this feature: User Interface Profile Settings
Temporarily Restricting Access
If you need to temporarily prevent a user from accessing the system without deleting their account:
- Edit the user
- Check the Restricted option
- Save changes
Restricted accounts:
- Cannot log in using any method
- Have all active sessions terminated immediately
- Preserve all account data and content ownership
- Can be reactivated by unchecking the Restricted option
Removing Users
If you need to permanently remove a user:
- Click the next to the user
- Confirm the deletion when prompted
Content created by removed users remains in the system but will need to be reassigned to other users for ongoing management.
If you need assistance with user management, please contact our support team at support@wallboard.info