Okta SAML SSO
This guide walks you through connecting Wallboard to Okta with SAML 2.0, from creating the app integration to your first successful login.
For a field-by-field description of every SAML setting, see Custom Domain.
Prerequisites
Before you begin, make sure you have:
- A custom domain already set up by the Wallboard team. If you do not have one yet, contact [email protected].
- Administrator access to Wallboard.
- An Okta administrator account that can create app integrations — Super Administrator or Application Administrator.
Step 1: Copy Wallboard's SP Details
In Wallboard, navigate to Customer Settings > Custom Domain > SAML Settings. The SP Details section contains the two values Okta needs.
| Wallboard field | Enter it in Okta as |
|---|---|
| ACS URL (Assertion Consumer Service) | Single sign-on URL |
| Audience URI (SP Entity ID) | Audience URI (SP Entity ID) |
Keep this page open — you will paste these values into Okta in Step 3.
Step 2: Create the App Integration
- In the Okta Admin Console, go to Applications > Applications.
- Click Create App Integration.
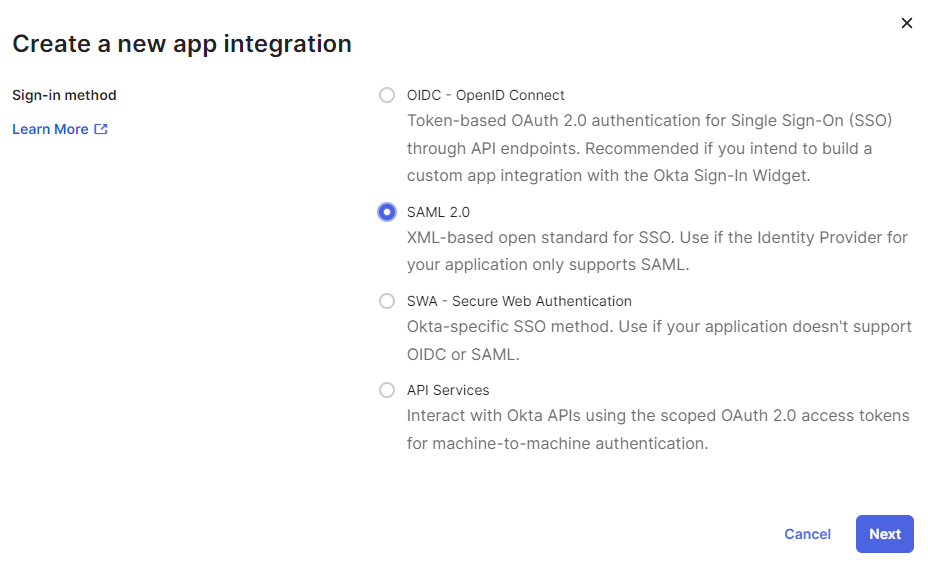
- Select SAML 2.0 and click Next.
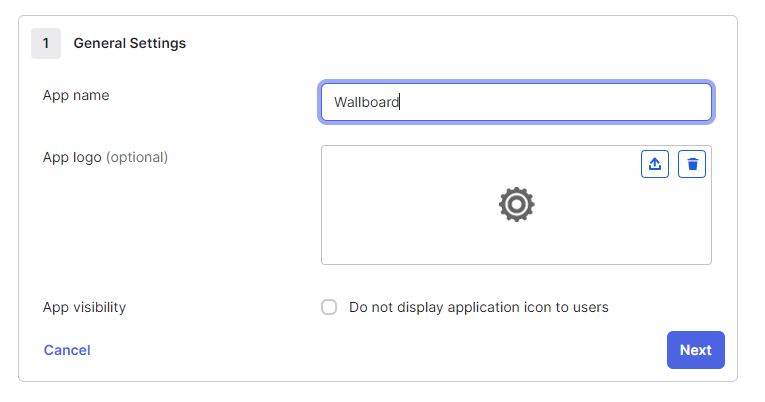
- On the General Settings step, enter an app name (for example,
Wallboard), optionally upload a logo, and click Next.
Step 3: Configure SAML
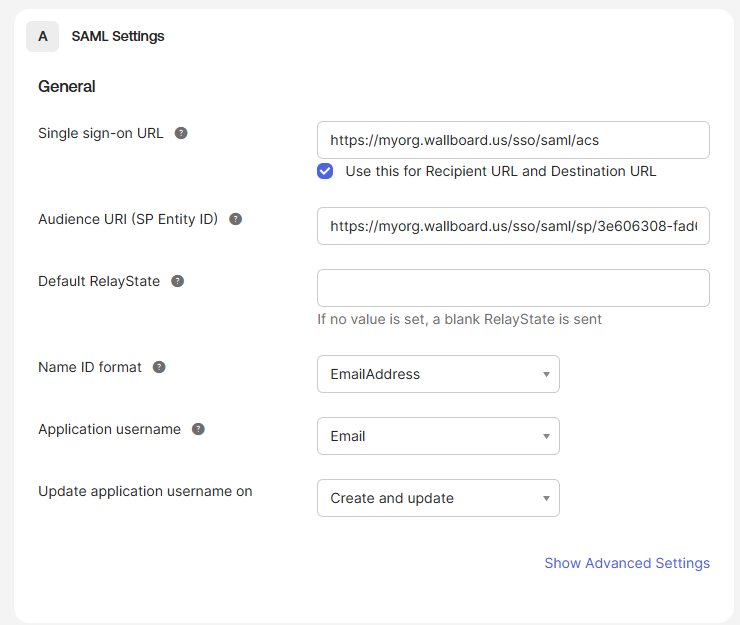
On the Configure SAML step, enter the following:
| Okta field | Value |
|---|---|
| Single sign-on URL | The ACS URL from Wallboard |
| Use this for Recipient URL and Destination URL | Leave checked |
| Audience URI (SP Entity ID) | The Audience URI from Wallboard |
| Default RelayState | Leave empty |
| Name ID format | EmailAddress |
| Application username | Email |
Leave the remaining settings at their defaults. Okta signs the assertion with RSA-SHA256, which is what Wallboard expects.
Wallboard supports both. Leaving Default RelayState empty lets the Wallboard tile on the Okta dashboard start an IdP-initiated login, and signing in directly at your custom domain works as an SP-initiated login.
Step 4: Add Attribute Statements
Still on the Configure SAML step, scroll down to Attribute Statements and add the following:
| Name | Name format | Value |
|---|---|---|
email | Unspecified | user.email |
displayName | Unspecified | user.displayName |
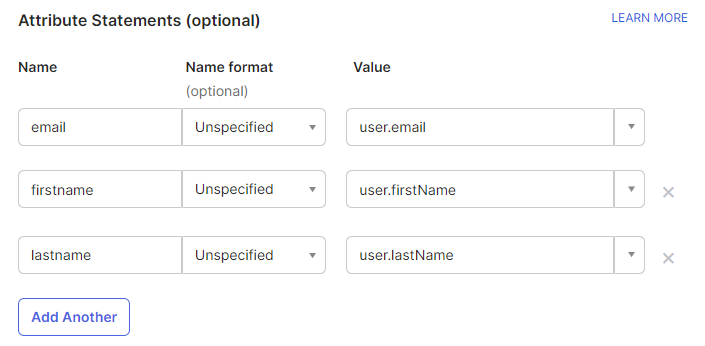
Wallboard identifies users by this attribute, and it must contain a unique email address. Setting the Name ID format to EmailAddress is not sufficient on its own — Wallboard reads the email from the attribute statement only, and login fails if it is missing.
user.displayName is emptyOkta leaves displayName blank for many users, because it populates firstName and lastName instead. An empty display name is safe:
- New users are created with their email address as their Wallboard name.
- Existing users keep the name they already have. Wallboard never blanks an existing name.
To send a proper name anyway, use an Okta expression as the value instead of user.displayName:
String.join(" ", user.firstName, user.lastName)
While this attribute is mapped, your identity provider is the source of truth — an incorrect value overwrites the Wallboard name on every login. To stop syncing names altogether, leave Display name attribute empty in Wallboard.
If you plan to sync roles, teams, or UI profiles from Okta, add those attribute statements now as described in Syncing Roles, Teams, and UI Profiles.
Click Next, choose whichever option applies on the feedback step, and click Finish.
Step 5: Assign Users and Groups
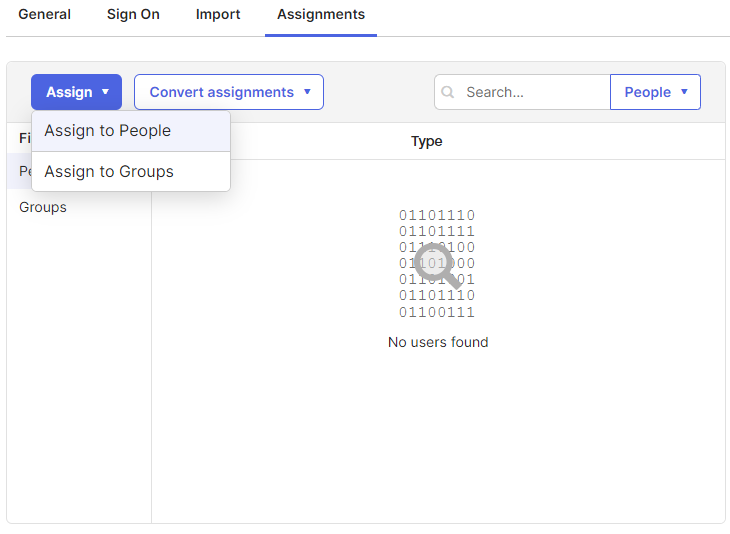
- Open the Assignments tab of your new app.
- Click Assign and choose Assign to People or Assign to Groups.
- Assign everyone who should be able to sign in to Wallboard.
Users who are not assigned to the app integration cannot sign in to Wallboard through SSO.
Step 6: Copy Okta's Metadata URL
- Open the Sign On tab of your app.
- In the SAML 2.0 section, copy the Metadata URL.
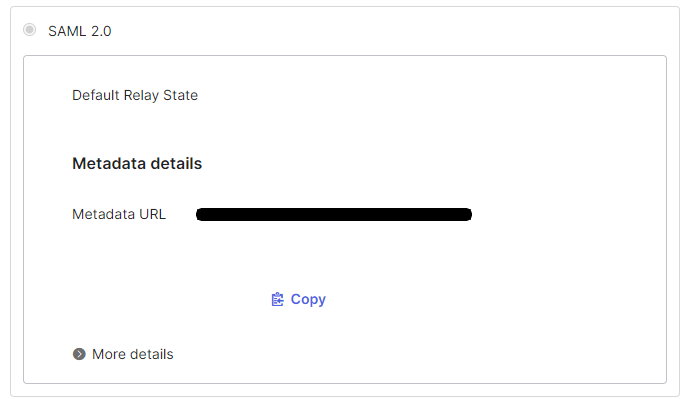
If you prefer to enter the values by hand, click View SAML setup instructions on the same tab. It lists the Identity Provider Single Sign-On URL, the Identity Provider Issuer, and the X.509 certificate, which correspond to Wallboard's IdP SSO URL, IdP Entity ID, and IdP Public Certificate.
Step 7: Enter Okta's Details in Wallboard
Back in Wallboard, on the SAML Settings page:
-
Click the gear icon (⚙) next to IdP configuration.
-
Set IdP type to Custom (Generic SAML 2.0).
-
Paste the Metadata URL from Step 6 into IdP Metadata URL. Wallboard fills in the IdP Entity ID, IdP SSO URL, and IdP Public Certificate automatically.
-
Set the attribute names to match the attribute statements you created in Step 4:
Wallboard field Value Email attribute name emailDisplay name attribute displayName -
Click Save.
Because you supplied the Metadata URL rather than a fixed certificate, Wallboard re-reads Okta's metadata once a day and picks up a new signing certificate on its own. The previous certificate is retained and still accepted while the changeover settles, so logins keep working through an Okta certificate rotation.
Wallboard also emails a warning 30 days before the current certificate expires, and records each refresh in Settings > Activity Logs.
None of this applies if you enter the certificate by hand instead of using the Metadata URL — you would then have to replace it yourself before it expires.
Step 8: Enable SSO and Test
- Toggle SAML SSO enabled at the top of the SAML Settings page.
- Review the Single sign on settings card. If you want users who have never logged in before to be created automatically, enable Enabled automatic user creation when role and customer information is given and set a Default role — the least privileged role is recommended.
- Open your custom domain in a private browser window and sign in with an assigned Okta account.
Keep a working administrator session open in another browser while you test. Turning on Hide username and password fields on login page before SSO is confirmed working can lock everyone out of the domain.
Syncing Roles, Teams, and UI Profiles (Optional)
Skip this section if you will manage roles, teams, and UI profiles inside Wallboard.
Okta can send each value in its own attribute, which is the recommended approach here. Turn on the matching toggles in Wallboard's Mapping section — Sync User Roles from IdP, Sync Team Assignments from IdP, and Sync UI Profiles from IdP — then set the attribute names to role, teams, and uiProfile.
Role and UI profile are single-valued, so drive them from Okta user profile attributes:
-
Go to Directory > Profile Editor, open the Okta user profile, and add custom attributes — for example
wallboardRoleandwallboardUiProfile. -
Populate them for your users, directly or through your directory integration.
-
In the app's Configure SAML step, add the attribute statements:
Name Name format Value roleUnspecified user.wallboardRoleuiProfileUnspecified user.wallboardUiProfile
Accepted role values are VIEWER, EDITOR, APPROVER, TECHNICIAN, and OWNER (case-insensitive).
Teams can hold several values, so drive them from Okta groups:
-
Create an Okta group for each Wallboard team, naming each group exactly after the Wallboard team ID (for example,
e7c5a8b5aa06482e8d7573c3b8b5f09b). -
Add the relevant users to those groups.
-
In the app's Configure SAML step, add a Group Attribute Statement:
Name Name format Filter teamsUnspecified A filter that matches only your Wallboard team groups
Team IDs and UI profile IDs are found in Wallboard under their respective settings pages. Copy them exactly.
If you would rather drive everything from one attribute — for example an Okta expression that builds a single string — Wallboard accepts a comma-separated value and splits it, routing each part by its prefix:
role-TECHNICIAN,team-e7c5a8b5aa06482e8d7573c3b8b5f09b,ui-profile-432
Prefixes are required in that case, because one attribute is feeding several mappers. The split only applies when the attribute carries exactly one value, so do not mix a comma-separated string with additional separate values in the same attribute.
Once a sync toggle is on, the identity provider becomes the source of truth on every login. A user who logs in without the matching attribute is reset to the corresponding default in Single sign on settings — Default role, Default teams, or Default user interface profile — and has the value cleared if no default is set. Changes made by hand in Wallboard are overwritten at the next login. Make sure every assigned user has a value before enabling the toggle.
Default teams are always added on top of the teams attribute values, so members end up in those teams as well.
Troubleshooting
Where to Look First
A failed SSO login is quiet. The person signing in does not reach Wallboard — the browser stops on an error at the callback URL — and the reason is not written for them to read. Diagnose from these sources, in this order:
| Source | What it tells you |
|---|---|
| Wallboard > Settings > Activity Logs | The outcomes Wallboard records. Enable the Log Level and Message columns and look for messages starting with SAML. |
| Okta > Reports > System Log | Whether Okta issued an assertion at all, and whether the user was allowed to launch the application. |
| A browser SAML trace | The raw assertion, when you need to see exactly which attributes were sent and under what names. |
Wallboard records a successful provisioning (New user '…' created via SAML SSO with role '…') and a user turned away because automatic user creation is off (SAML login attempt for non-existent user '…').
Assertions rejected during validation — a missing email attribute, a signature that does not verify, a mismatched audience — are refused before anything is logged. A failed login that leaves no Activity Logs entry at all points at the assertion itself, so check the Okta System Log and a SAML trace next.
Common Causes
| What you observe | Likely cause and fix |
|---|---|
| Login fails right after Okta redirects back, and no Activity Logs entry appears | The email attribute statement is absent or its name does not match the Email attribute name in Wallboard. A NameID alone is not enough. |
| Same as above, and the Okta System Log shows the assertion was issued normally | The Single sign-on URL or Audience URI in Okta does not exactly match Wallboard's ACS URL and Audience URI. Re-copy both from SP Details. |
Activity Logs shows SAML login attempt for non-existent user | Automatic user creation is disabled. Either enable it in Single sign on settings or create the user in Wallboard first. |
| A user's role, teams, or UI profile changes unexpectedly after they log in | Mapping is enabled, but Okta sent no value for that user, so Wallboard applied the default from Single sign on settings — or cleared the value if no default is set. Populate the profile attribute or group membership, or turn the sync toggle off. |
| The Wallboard tile is missing from the user's Okta dashboard, or launching it is refused | The user is not assigned to the app integration. Check the Assignments tab. |
| Logins that worked yesterday now fail for everyone | The signing certificate changed and Wallboard is still on the old one. If you configured Wallboard with the Metadata URL this should correct itself daily, so look in Activity Logs for Failed to refresh SAML certificate — a metadata URL that Wallboard cannot reach is the usual cause. If you pasted the certificate by hand, replace it yourself, or switch to the Metadata URL so future rotations are automatic. |
| Okta reports a successful sign-in, but Wallboard still refuses the user | SSO may be disabled on that individual Wallboard user account. Check the user's settings in Wallboard. |
Other SAML 2.0 Providers
The Wallboard side of this guide is identical for any SAML 2.0 identity provider — Google Workspace, Shibboleth, PingFederate, and others. Use Custom (Generic SAML 2.0) as the IdP type, send an email attribute and optionally a display name attribute, and set the attribute names in Wallboard to whatever your provider sends.
Need Help?
Contact us at [email protected] or [email protected]